Concrete Washout Pits: Ensure Site Compliance in 2026
The last truck has finished the pour. The pump crew is breaking down. Someone grabs a hose and asks the question that causes more job site headaches than it should: where are we washing out?
If that answer is “over there by the fence” or “just into a scraped hole,” you’re already behind. Concrete wash water isn’t harmless gray soup. It’s high-pH slurry, loaded with fines, and once it runs into a drain, a ditch, or soft ground, the cleanup gets expensive fast. Worse, it slows the job when the superintendent should be focused on schedule, access, and the next inspection.
A good washout setup is one of those site controls that separates organized crews from chaotic ones. It protects the site, keeps the SWPPP in line, and gives drivers, pump operators, and finishers one clear place to do the dirty part of the work without turning the whole project into a compliance problem.
Why Concrete Washout Pits Are Non-Negotiable on Modern Job Sites
Concrete work always creates washout. The only question is whether you planned for it.
That matters because the volume adds up faster than many crews realize. From 2017 to 2020, Diligent Delivery Systems collected 63,823 tons of concrete washout from eight South Florida counties, averaging approximately 2,000 tons per month, according to the Diligent concrete washout report. That’s not a niche waste stream. That’s a constant byproduct of active construction markets.
On site, washout usually becomes a problem in one of three ways. Nobody assigned a location. The location was assigned, but it was undersized. Or the setup worked on a dry week and failed the minute weather, traffic, or production changed.
What goes wrong when crews wing it
When there’s no proper washout area, crews improvise. They rinse chutes into dirt. They wash tools near curb lines. They use a makeshift depression that turns into a muddy overflow point after a storm.
That kind of shortcut creates two problems at once:
- Environmental exposure: slurry can move into stormwater paths, low spots, and surrounding soils.
- Operational drag: once a washout area becomes a mess, trucks avoid it, labor wastes time, and someone has to stop productive work to deal with it.
Practical rule: If drivers have to ask where washout goes, the plan is already too loose.
A concrete washout pit isn’t paperwork theater. It’s as basic as staging your forms where the crane can reach them. If you don’t set it up right, the whole operation feels it.
Why professionals treat washout like any other critical control
Good site managers don’t treat washout as an afterthought because it touches compliance, access, cleanup, and closeout all at once.
A proper washout area does four jobs:
- Contains slurry in one known location
- Keeps crews from creating multiple problem spots
- Supports the site’s stormwater controls
- Makes cleanup predictable instead of reactive
It also sends a message. Clean laydown areas, marked haul routes, and a designated washout zone tell inspectors and subcontractors the same thing: this site is being run on purpose.
Concrete washout pits belong in the same category as trench protection and traffic control. You don’t install them because they look good on a checklist. You install them because the job gets riskier and sloppier without them.
What Is a Concrete Washout Pit and How Does It Work
Think of a concrete washout pit as the job site sink. It’s the one place built to take the mess that comes from rinsing chutes, pumps, hoppers, tools, and finishing gear without letting that waste spread across the project.
That’s the basic idea. But a compliant washout system is more than a hole in the ground.
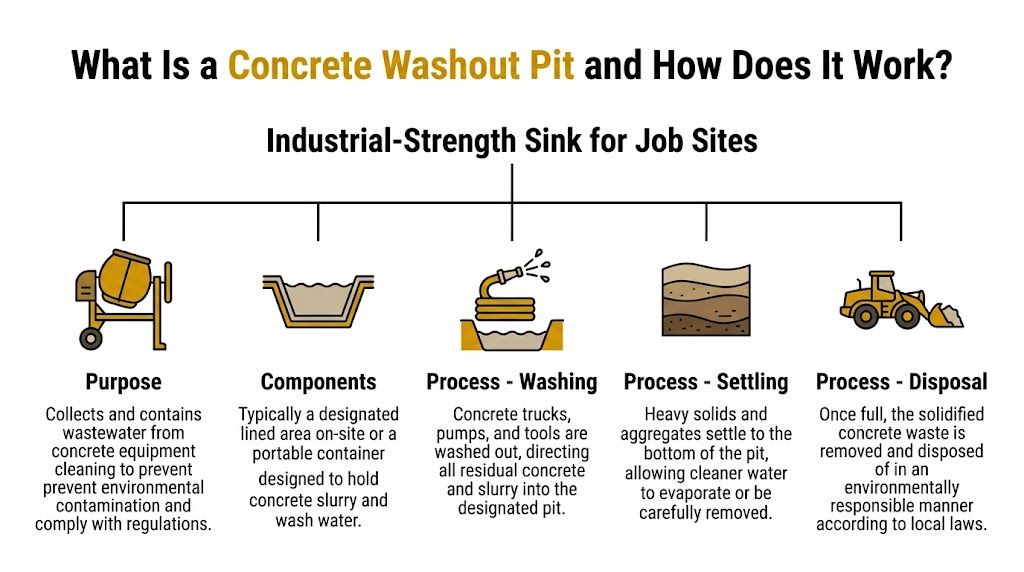
The parts that make it work
At minimum, a washout setup needs containment, separation from the surrounding ground, and clear access for the people using it.
A practical setup usually includes:
- Containment area: either an excavated pit or a portable container that receives all wash water and solids.
- Impermeable liner or watertight body: this is what keeps the slurry from migrating into soil.
- Stable approach path: trucks and pump crews need to reach it without rutting the site or backing into a bad angle.
- Visible marking: if it’s not obvious, somebody will wash out somewhere else.
- Capacity for real job conditions: not just a normal day, but a busy day with extra rinsing, leftover mud, and weather.
The function is simple. Crews wash equipment into the designated area. The heavier solids settle. Water remains above the solids. Over time, the material hardens or is removed through the site’s chosen handling process.
What a washout pit is not
A washout pit is not a random excavation near the pour. It’s not a low corner of the site that “ought to hold water.” And it’s definitely not a storm drain inlet with gravel bags nearby.
Those setups fail because they confuse temporary convenience with actual containment. Concrete slurry doesn’t care about your intent. If the washout area leaks, overflows, or sits in the wrong place, the site still owns the result.
A good washout area should be easier to use than the wrong option. If crews have to fight mud, distance, or poor access, they’ll start freelancing.
How the process should look in the field
A disciplined washout routine is straightforward:
- Drivers and pump operators are told the location before discharge starts.
- Washout happens only in that area.
- The superintendent or designated competent person checks capacity before it becomes critical.
- The area is maintained so the next crew can use it safely.
That last point gets overlooked. A washout pit that’s technically present but half full, inaccessible, or crusted over at the entry point doesn’t solve much. It just creates a false sense of compliance.
The best setups work because they remove friction. The pit or container is close enough to use, tough enough to hold up, and obvious enough that nobody has an excuse to miss it.
Navigating SWPPP and Environmental Regulations
A lot of crews hear “SWPPP” and think paperwork binder. On the ground, it’s much simpler than that. It’s the site’s operating rulebook for keeping pollutants out of stormwater.
Concrete washout belongs near the top of that list because slurry moves fast when crews get busy and weather turns. If you don’t control it, runoff will.

The setback rules are there for a reason
The EPA concrete washout guidance requires washout facilities to be located at least 100 feet from sensitive resources like storm drains, ditches, or water bodies, and 1,000 feet from wells or drinking water sources. That’s not bureaucratic overkill. It’s distance as a safety buffer.
Once slurry gets into a drain line or flowing ditch, you’ve lost control of it. The site is no longer dealing with a housekeeping issue. It’s dealing with off-site migration risk.
A lot of field failures start in this way. Someone picks the “convenient” spot without checking drainage patterns, nearby inlets, or the nearest well. It may look fine on a dry afternoon. It won’t look fine after rinse water runs downhill.
Why pH matters to inspectors
Concrete wash water is highly alkaline. The verified guidance allows one key point to be said plainly: its pH is typically 12 to 13 in EPA-related washout guidance summarized in the verified data. That’s why inspectors care so much about leaks and overflows.
High-pH wash water can affect soil and surface water quickly. You don’t need a giant spill for it to become a problem. A small but repeated release can be enough to trigger corrective action, documentation, and unwanted attention.
Here’s the field version of the science: think of fresh slurry like a chemical you’d never dump beside a catch basin. Because that’s what it is from a stormwater standpoint.
What the SWPPP expects from your crew
A compliant site usually handles washout the same way it handles fuel and concrete pumping. It assigns responsibility and removes ambiguity.
That means the SWPPP should match field reality:
- The location is identified clearly: not “TBD when concrete arrives.”
- The control is built before pours begin: not after the first truck asks where to rinse.
- The crew knows the rule: one washout area, no exceptions.
- The control is inspected and maintained: especially after rain and high-volume placement days.
If your SWPPP map shows one thing and your truck drivers are doing another, the paper plan won’t save you.
The expensive part of non-compliance isn’t just the fine
Contractors usually focus on citations, and they should. But pain often comes from the chain reaction around the citation.
A failed washout setup can lead to:
| Issue | What it does to the job |
|---|---|
| Cleanup work | Pulls labor and equipment off productive tasks |
| Rework | Forces crews to rebuild or relocate controls midstream |
| Inspection delays | Creates extra scrutiny on the rest of the site |
| Subcontractor confusion | Encourages more off-plan behavior |
That’s why experienced supers treat washout like traffic routing. You don’t hope people figure it out. You establish the route, mark it, and keep it functioning.
How to Correctly Size and Site Your Washout Area
Most washout failures don’t happen because nobody tried. They happen because someone guessed.
The pit looked big enough. The liner seemed good enough. The location was close enough. Then a few trucks washed out, rain hit overnight, and the freeboard disappeared. That’s how a manageable control turns into a cleanup issue.

Start with the published minimums
The Greenville County concrete washout specification gives field-useful benchmarks. Standard designs require a minimum 10 ft x 10 ft surface area and a 10-mil polyethylene liner. Pits must be sited at least 50 feet from storm drains and waterbodies and maintain 4 to 12 inches of freeboard to prevent overtopping during rain.
Those numbers matter because they force discipline. A washout area that’s too small or too close to a water pathway might look serviceable at first, but it leaves no room for volume swings, poor weather, or sloppy use.
Use real washout volume, not optimistic guesses
EPA guidance in the verified data notes that sizing should account for 20 to 40 gallons per ready-mix truckload, prorated by cubic yards, plus a minimum of 50 gallons for pump trucks. That’s the right way to think about it. Tie capacity to the work, not to whatever container happened to be available.
A practical sizing approach looks like this:
- Count the expected truck activity: not just the main pour, but returns, rinse cycles, and cleanup.
- Add pump washout volume: pump operations create their own waste stream and need to be included.
- Account for tools and crew cleanup: screeds, buggies, hoses, and small equipment all add up.
- Leave room for weather: if rain is possible, protect the freeboard like it’s part of your capacity, because it is.
One of the biggest blind spots in the field is precipitation. The guidance says systems must be designed so overflows don’t occur due to inadequate sizing or precipitation, but it doesn’t hand you a universal storm formula. That means the superintendent has to think ahead. If the forecast looks bad, don’t run the washout right up to the edge and hope the sky cooperates.
Field check: If the washout area already looks “about full enough,” it’s full. Concrete work has a way of producing one more rinse cycle than the plan assumed.
Site it where trucks can use it without creating new problems
Good siting is part compliance and part traffic management. You need legal separation from drains and water, but you also need a location that a driver can reach without cutting across soft ground, backing blind, or blocking other work.
Look for a spot that gives you:
- Stable ground
- Simple approach and exit
- Visibility from active work zones
- Separation from stormwater flow paths
Avoid the temptation to hide the washout area in the farthest corner of the project. If it’s too inconvenient, people won’t use it consistently. A washout control only works when the easiest option is also the correct one.
Don’t forget rainfall and freeboard
Rain turns an average setup into a stress test. The published requirement for 4 to 12 inches of freeboard exists for a reason. That vertical buffer is the difference between a contained system and a gray overflow line running downslope.
In wet periods, smart crews adjust before the storm, not after:
- Clean out early: don’t squeeze one more day from a nearly full pit.
- Check the liner and edges: weak points fail when water levels rise.
- Keep stormwater out: don’t let surrounding runoff use the washout as a catch basin.
- Reassess after every heavy rain: today’s safe volume may not be tomorrow’s.
Sizing and siting aren’t glamorous, but they decide whether your washout area acts like a control or a liability.
Permanent Pits vs Portable Rentals Which Is Right for Your Project
This decision usually comes down to control versus convenience, but not in the way people think. A lot of teams assume digging a pit is the simple option because it uses site labor and familiar materials. Sometimes it is. Sometimes it creates more risk than it saves.
Portable containers solve a different problem. They standardize the setup and remove a lot of field variability. That matters on tight schedules, paved sites, renovation work, and projects where inspectors are paying close attention.
Side by side comparison
The verified data shows that prefabricated concrete washout containers install in under an hour, while digging and lining an excavated pit typically takes 4 to 8 hours, according to the prefabricated washout container guidance. The same verified source states that prefabricated units achieve near-100% containment, while unlined or poorly lined pits can lose 20% to 30% of slurry to soil absorption.
That doesn’t make portable the right answer every time, but it does sharpen the trade-off.
| Factor | Excavated Pit (DIY) | Portable Rental Container (e.g., Reborn Rentals) |
|---|---|---|
| Setup time | Slower. Requires layout, digging, lining, and access prep | Faster. Delivered ready for placement and use |
| Containment reliability | Depends heavily on liner quality, ground conditions, and workmanship | More consistent when the container is intact and properly placed |
| Site disturbance | Adds excavation and later restoration work | Minimal ground disturbance |
| Flexibility | Can be shaped to site conditions if there’s room | Easy to move or swap if logistics change |
| Rain management | More vulnerable if edges slump or runoff enters the pit | Easier to inspect visually and keep contained |
| Closeout | Requires removal of hardened material and site restoration | Simpler removal path for many projects |
When an excavated pit still makes sense
There are jobs where an excavated pit is perfectly workable. Large open sites with long durations and available earthwork crews can support one well. If the team has the discipline to line it correctly, protect it from runoff, and maintain it, a pit can do the job.
But “can do the job” isn’t the same as “best fit.”
Excavated pits tend to struggle when the project has limited space, heavy rain exposure, finished surfaces, or frequent changes in access. They also struggle when the site has many users and no one effectively owns the washout area day to day.
When portable containers usually win
Portable units are strongest where predictability matters more than improvisation. That includes urban infill, municipal work, commercial renovations, phased projects, and sites where you need a clean setup fast.
They also help when the problem isn’t volume alone, but behavior. A visible steel container with defined edges is easier for crews to respect than a lined depression that starts looking like part of the dirt work.
A portable unit gives the field fewer ways to get creative, and that’s often the point.
The right choice comes down to how much uncertainty your site can tolerate. If you want to reduce variables, portable containers usually do that better.
Your Checklist for Renting a Concrete Washout Container
Renting a container sounds simple until the wrong one shows up, the delivery truck can’t place it where you need it, or the crew realizes halfway through the pour that capacity was misunderstood. A quick call and a vague order won’t cut it.
Use a checklist. It saves time, avoids assumptions, and gives the rental provider the information they need to match the unit to the work.
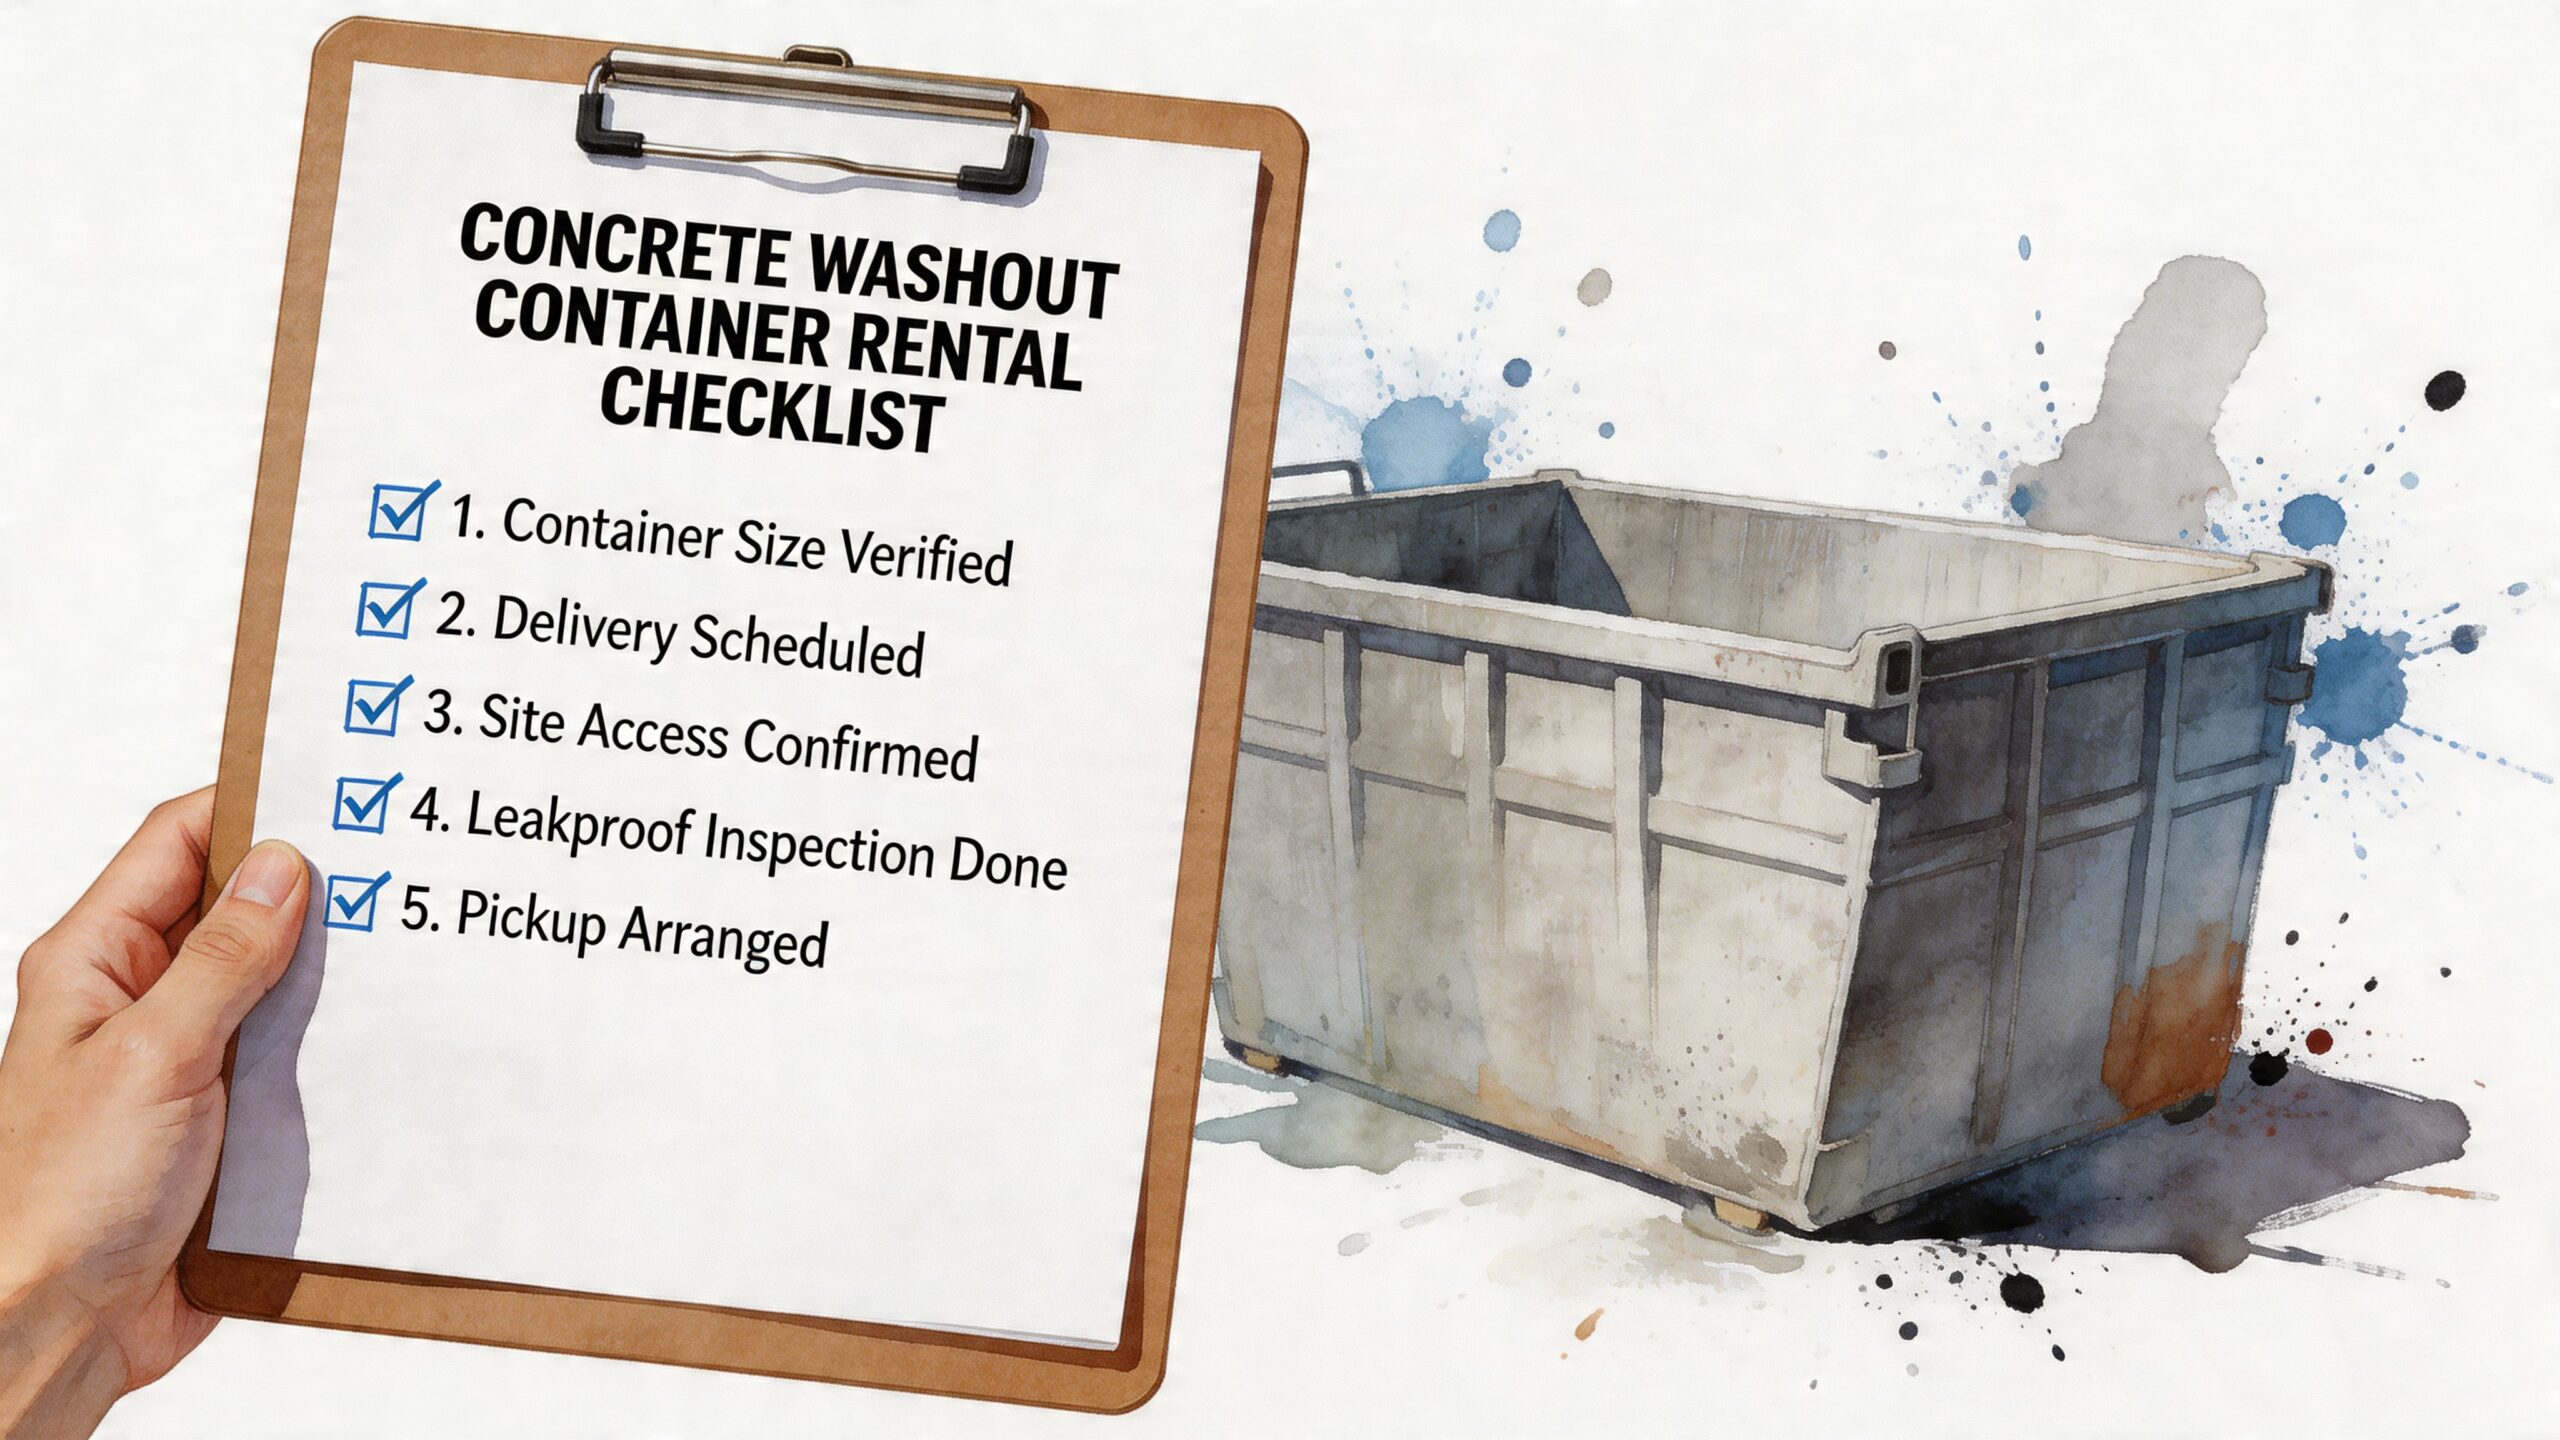
What to confirm before you book
- Capacity: Ask for the actual liquid and load capacity, not just “small” or “large.” Reborn Rentals lists a 72' x 72' x 24' option at approximately 18.25 tons and about 441 gallons, and a 72' x 72' x 14' option at about 310 gallons, based on the publisher information provided.
- Container condition: Confirm that the unit is watertight, job-ready, and intended for concrete slurry containment.
- Project duration: Match the rental window to the concrete schedule, plus enough buffer for delays or weather.
- Delivery access: Tell the provider about gates, grade changes, rough terrain, or tight placement areas before delivery day.
- Pickup expectations: Clarify whether you’re responsible for calling in removal, keeping material below a certain fill level, or preparing the unit for haul-off.
Questions that prevent field problems
Don’t just ask what the daily rate is. Ask the questions that affect whether the rental works once the truck leaves.
A solid call with a provider should cover:
| Ask about | Why it matters |
|---|---|
| Placement footprint | Helps you verify clearances and truck access |
| Acceptable contents | Prevents mixing other waste streams into the container |
| Service area and timing | Reduces the chance of delivery or pickup delays |
| Extra charges | Helps you budget for rough terrain, express service, or distance |
| Support channels | Useful when field conditions change and you need a fast answer |
Match the unit to the operation, not just the bid line
A small renovation crew washing hand tools has different needs than a pump-and-place operation with repeated chute rinse-outs. Order based on actual use, not on the cheapest line item.
If the job is tight, ask yourself:
- Is the container close enough that drivers will use it?
- Can the delivery truck place it without disrupting other operations?
- Will rain or runoff collect around the unit?
- Does the pickup plan fit the phase schedule?
The best rental is the one that disappears into the workflow. It shows up on time, sits where it should, holds what it needs to hold, and leaves without turning closeout into a scramble.
Best Practices for Washout Maintenance and Decommissioning
A washout area can start compliant and still fail later if nobody maintains it. Daily attention matters. Check for leaks, damage, loss of freeboard, and muddy access. If rain is coming, inspect it before the storm, not after the overflow.
During active work, keep the rules simple for crews:
- Use one designated washout location: no side rinsing near curbs or drains.
- Watch fill level regularly: don’t wait until solids have eaten up the working volume.
- Keep runoff out: a washout area should not become a stormwater collection point.
- Maintain access: if the approach turns into deep mud or blocked traffic, people will stop using it correctly.
The industry is much weaker at closeout than setup. Guidance often says to “properly dispose of all materials” but leaves major details unanswered, and that gap can create remediation costs and citations during site closure, as noted in the Chagrin Falls concrete washout guidance.
What to do at closeout
Start with the obvious but often ignored rule. Let the concrete residue fully harden before removal if that’s the applicable method for your site and jurisdiction.
Then work through closeout deliberately:
- Confirm the waste handling path: don’t assume all hardened residue will be treated the same everywhere.
- Inspect the surrounding area: excavated pits may leave behind impacted soil or staining that needs attention.
- Document removal and final condition: especially if the project has formal environmental closeout requirements.
- Check local expectations for pH or remediation: jurisdictional differences concerning these expectations can catch teams off guard.
The washout isn’t finished when the pour is finished. It’s finished when the site can close without a lingering environmental question.
Common Questions About Concrete Washout Pits
Can I just let wash water evaporate in place
Only if it’s in a properly designed, properly located containment system and the remaining material is managed correctly. Letting slurry sit in an uncontained scrape or random low area isn’t the same thing. Evaporation doesn’t fix bad siting, leakage, or poor closeout.
What should the crew do if heavy rain threatens an overflow
Act early. Stop treating the remaining freeboard like spare space. Reduce the load on the washout area, clean out or swap the unit if needed, and keep surrounding stormwater from entering it. The worst move is waiting until water is already near the top edge and trying to improvise during the storm.
Can hardened washout material be recycled
Sometimes, yes. The verified data on large-scale washout management shows that recovered concrete washout material can be recycled through controlled processes, but field recycling depends on the handling method, contamination level, and local outlet. Don’t assume every pile of hardened residue is automatically reusable. Confirm the disposal or recycling path before closeout so the crew doesn’t get stuck with material and no approved destination.
If you need a concrete washout setup that’s straightforward to order and built for real job site conditions, Reborn Rentals offers durable washout container rentals with clear pricing, delivery coordination, and multiple support channels so your crew can keep the site compliant without slowing down the work.